Hello! Let me introduce an app I created as a browser extension that overlays a custom SVG image (a pink square image) on a fetched favicon to display it as a new favicon.
1. Required files and Prerequisites
- content.js: A JavaScript file that is injected from the extension app into the browser’s tab page to operate. It handles double-click events, receives the Base64-encoded favicon, creates overlayed custom SVG image and updates the favicon.
- background.js: A JavaScript file that resides on the server side and continuously runs when the extension app is downloaded. It converts the original PNG-formatted favicon into Base64 format.
I’m using a svg.js library to manage svg images. Please see the previous post to see how to get and use the library.
2. What is done in content.js
function setFavicon(svgContent) {
    const base64Svg = btoa(unescape(encodeURIComponent(svgContent)));

    const head = document.head;
    head.querySelectorAll("link[rel~='icon']").forEach((el) => el.remove());

    const newFavicon = document.createElement('link');
    newFavicon.rel = `icon`;
    newFavicon.type = `image/svg+xml`;
    newFavicon.href = `data:image/svg+xml;base64,${base64Svg}`;

    head.appendChild(newFavicon);
}

chrome.runtime.onMessage.addListener(function(message, sender, sendResponse) {
    if (message.action === 'sendBase64Favicon') {
        var draw = SVG().addTo('body').size(100, 100);
        draw.image(message.favicon).size(100, 100);
        draw.rect(50, 50).attr({ fill: '#f06' }).move(50, 0);

        const markedFavicon = draw.svg();
        setFavicon(markedFavicon);

        return true;
    }
});
In “chrome.runtime.onMessage.addListener”, create the 100 * 100 svg image, add a base64 formatted favicon that is received from background.js. And add rectangle filled with pink.
In “setFavicon”, all svg data is converted to base64 format data. And remove the current favicon then set the new favicon.
3. What it done in background.js
let doubleClickedTab = null;
let base64Favicon = null;

async function ConvertPngToBase64(imageURL) {
    fetch(imageURL)
    .then(response => response.blob())
    .then(blob => {
        const reader = new FileReader();
        reader.onloadend = () => {
            base64Favicon = reader.result;
        };
        reader.readAsDataURL(blob);
    })
    .catch(error => {
        console.error("error:", error);
        sendResponse({ base64: null });
    });

    return true;
}


// Convert PNG Favicon to Base64 format
const faviconUrl = `https://www.google.com/s2/favicons?domain=${doubleClickedTab.url}`;
ConvertPngToBase64(faviconUrl);

// Send Base64-Favicon to content.js
chrome.tabs.sendMessage(sender.tab.id, {
    action: "sendBase64Favicon",
    favicon: base64Favicon
 });
This “ConvertPngToBase64” takes an image URL as input. It performs the following steps:
- Fetch the image: The
fetchfunction retrieves the image data from the specified URL. - Convert to Blob: The fetched image data is converted into a
Blobobject. - Convert Blob to Base64: A
FileReaderobject is used to read the blob as a Base64-encoded data URL. Once it finishes reading, the result is stored in thebase64Faviconvariable (It is done in Onloadend event.)
4. About design
To fetch the favicon, accessing external resources was necessary. However, due to CORS restrictions, it was hard to directly access and embed the favicon into the SVG from content.js. That’s the reason I decided to fetch the favicon were handled in background.js working as like server.

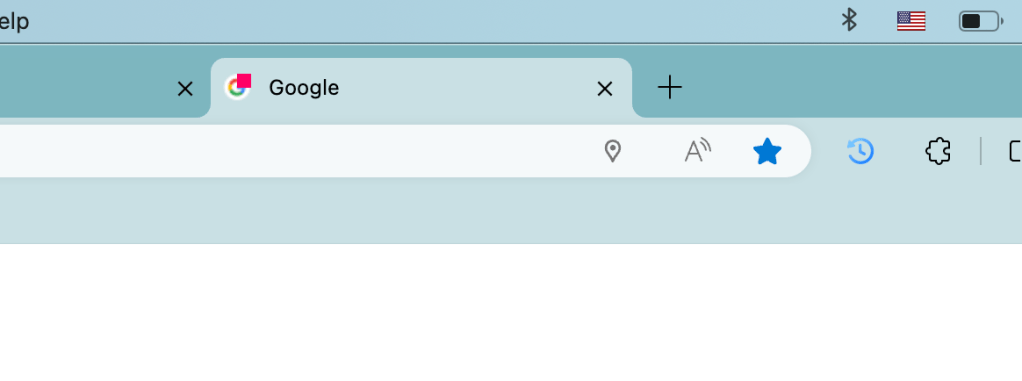
Anyway, when you double-click on the page, a pink square is now added to the favicon!

Leave a comment